Project 4: Deploy a FleetCart eCommerce website on AWS
We will deploy a scalable and highly available eCommerce website on AWS using the FleetCart Laravel template.
Overview
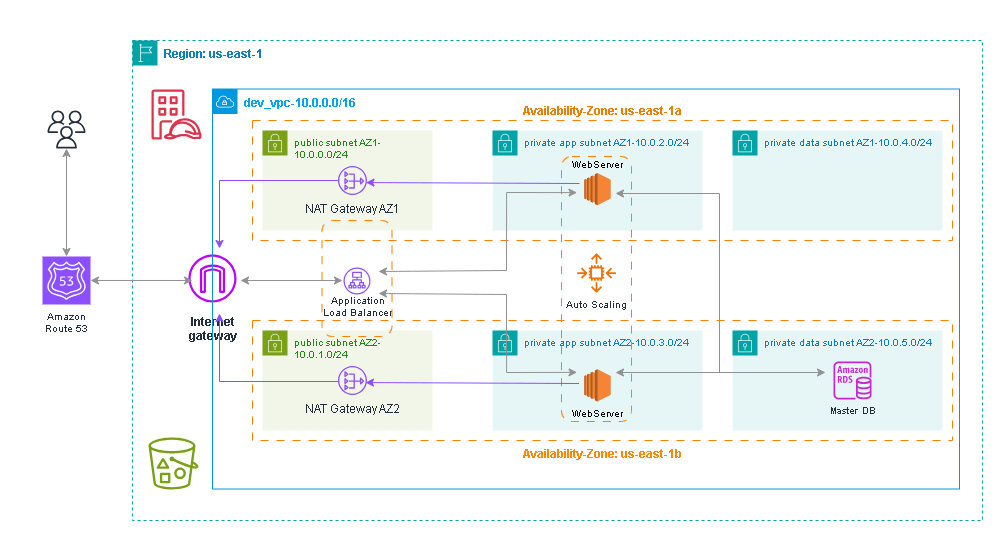
This documentation presents a comprehensive guide detailing the deployment of an eCommerce website utilizing the FleetCart Laravel template on AWS EC2 instances. The implementation leverages the 3-Tier VPC previously established in Project-1 to facilitate the deployment process.
The deployment procedure encompassed a meticulous setup involving a variety of AWS services. Tasks included the establishment of a robust VPC architecture incorporating a single instance RDS setup, configuration of EC2 instances, creation of AWS S3 Buckets, and the implementation of an IAM Role to authorize communication between the EC2 Instance and S3 Buckets. Additionally, it involved the creation of an AWS Golden Image, configuration of an Application Load Balancer (ALB), DNS management using Route53, integration of SSL certification, enabling HTTPS listeners, and the implementation of an Auto Scaling Group.
Note that I already have my FleetCart website Template, Dummy Sales Items as well as my SQL data to feed into the website Database.
Architecture

The Architecture for this project includes the following AWS Services:
VPC (3-Tier-VPC with Security Groups)
Amazon RDS (MySQL 5.7)
Amazon S3 Bucket
IAM Role
Application Load Balancer
Auto-Scaling Group
My procedure is similar to that of Project-2 and Project-3. I made use of Terraform to deploy the VPC then clickops for deployment and configuration of the rest of the infrastructures.
Also, before starting this project, I already have my Domain Name and SSL Certificate.
VPC-Deployment
The Terraform script I used for the VPC deployment can be found here. The difference from Project-3 was only to take out the EFS security group configurations as it is not needed for this task.
RDS-Deployment
Our MySQL database will be established within the private data subnets. Below is a step-by-step overview of the database deployment process.
The initial step involves creating a Subnet Group, strategically placing RDS instances across various subnets within different Availability Zones (AZs). This setup ensures operational continuity for our RDS in case of any subnet or AZ failure. The Subnet Group creation involved selecting our two AZs along with the designated private data subnets.
Following this, the database itself was created using the Standard creation method and the MySQL engine. Opting for MySQL version 5.7.44, aligned with project requirements, I utilized the Dev/Test Template for cost-efficiency purposes, opting for a single DB Instance under Availability and Durability settings.
Defining the DB Instance Identifier, DB Name, DB Master Username, and Password for authentication purposes was the subsequent step. For the Instance Class, I utilized 'Burstable classes' and included previous generation classes, selecting the 'db.t2.micro' instance.
Configuring Database connectivity involved associating the VPC we deployed and our pre-configured Subnet Group, coupled with the Database Security Group implemented through Terraform. Designating the preferred AZ for database creation and opting for 'Password authentication' as the Database authentication method were integral parts of this phase.
Ensuring the database creation necessitated specifying the Initial Database Name under Additional configuration before proceeding to create the database.
S3-Buckets Creation
I created two S3 Buckets, one for the website files and another for dummy data:
Access the AWS Management Console and navigate to the S3 service. Create a bucket for your website files, ensuring a unique name and specifying the region. Then, create a separate bucket for the dummy data. Upload the corresponding files or directories into their respective buckets using the 'Upload' function within each bucket.
IAM-Role Configuration
Navigate to the AWS Management Console and access the IAM service. Proceed to create a new IAM Role. Choose 'AWS service' as the trusted entity and select EC2 as the service that will use this role.
Attach the 'AmazonS3FullAccess' policy to grant comprehensive S3 access to the EC2 instances associated with this role. Provide a descriptive name for the IAM Role and finalize by creating the role.
Webserver Configuration
Launch an EC2 Instance using the 'Amazon Linux 2' AMI to ensure PHP Version compatibility (PHP 7.4). Download the Private Key for the Instance on your PC, We will need it when setting up our database.
Set up network configuration with our VPC and select the Public Subnet AZ1. Attach the previously created IAM Role that grants S3 access to the EC2 instance.
For security configurations, attach the SSH, Webserver and Application Load Balancer(ALB) Security Groups.
Install and set up the necessary configurations for the deployment using the script below. Be sure to update values for your own S3 bucket for the website files in step 6.
#1. update ec2 instance
sudo yum update -y

#2. install apache and its addons
sudo yum install -y httpd httpd-tools mod_ssl
sudo systemctl enable httpd
sudo systemctl start httpd

#3. install php 7.4
sudo amazon-linux-extras enable php7.4
sudo yum clean metadata
sudo yum install php php-common php-pear -y
sudo yum install php-{cgi,curl,mbstring,gd,mysqlnd,gettext,json,xml,fpm,intl,zip} -y

#4. install mysql5.7
sudo rpm -Uvh https://dev.mysql.com/get/mysql57-community-release-el7-11.noarch.rpm
sudo rpm --import https://repo.mysql.com/RPM-GPG-KEY-mysql-2022
sudo yum install mysql-community-server -y
sudo systemctl enable mysqld
sudo systemctl start mysqld

#5. set permissions
sudo usermod -a -G apache ec2-user
sudo chown -R ec2-user:apache /var/www
sudo chmod 2775 /var/www && find /var/www -type d -exec sudo chmod 2775 {} \;
sudo find /var/www -type f -exec sudo chmod 0664 {} \;

#6. download the FleetCart zip web files from s3 to the html derectory on the ec2 instance
sudo aws s3 sync s3://adekunle-fleetcart-bucket /var/www/html

#7. unzip the FleetCart zip folder
cd /var/www/html
sudo unzip FleetCart.zip

#8. move all the files and folder from the FleetCart directory to the html directory
# Enable dotglob
shopt -s dotglob
sudo mv FleetCart/* /var/www/html
# Disable dotglob
#shopt -u dotglob

#9. delete the FleetCart and FleetCart.zip folder
sudo rm -rf FleetCart FleetCart.zip

#10. enable mod_rewrite on ec2 linux, add apache to group, and restart server
sudo sed -i '/<Directory "\/var\/www\/html">/,/<\/Directory>/ s/AllowOverride None/AllowOverride All/' /etc/httpd/conf/httpd.conf
sudo chown apache:apache -R /var/www/html
sudo service httpd restart

#11. Get public ip of our dev server
curl ifconfig.io
After the script has been fully executed, access the website through the browser using the public IP of our development server to complete the setup.
Fill in the configuration details for the database:
Host = RDS Endpoint
Port = RDS Port
DB Username = Master Username
DB Password = Master Password
Database = DB name [Be sure not to make use of DB Instance ID instead]
Input preferred details for the Website and Store
Import Dummy Data into the Website
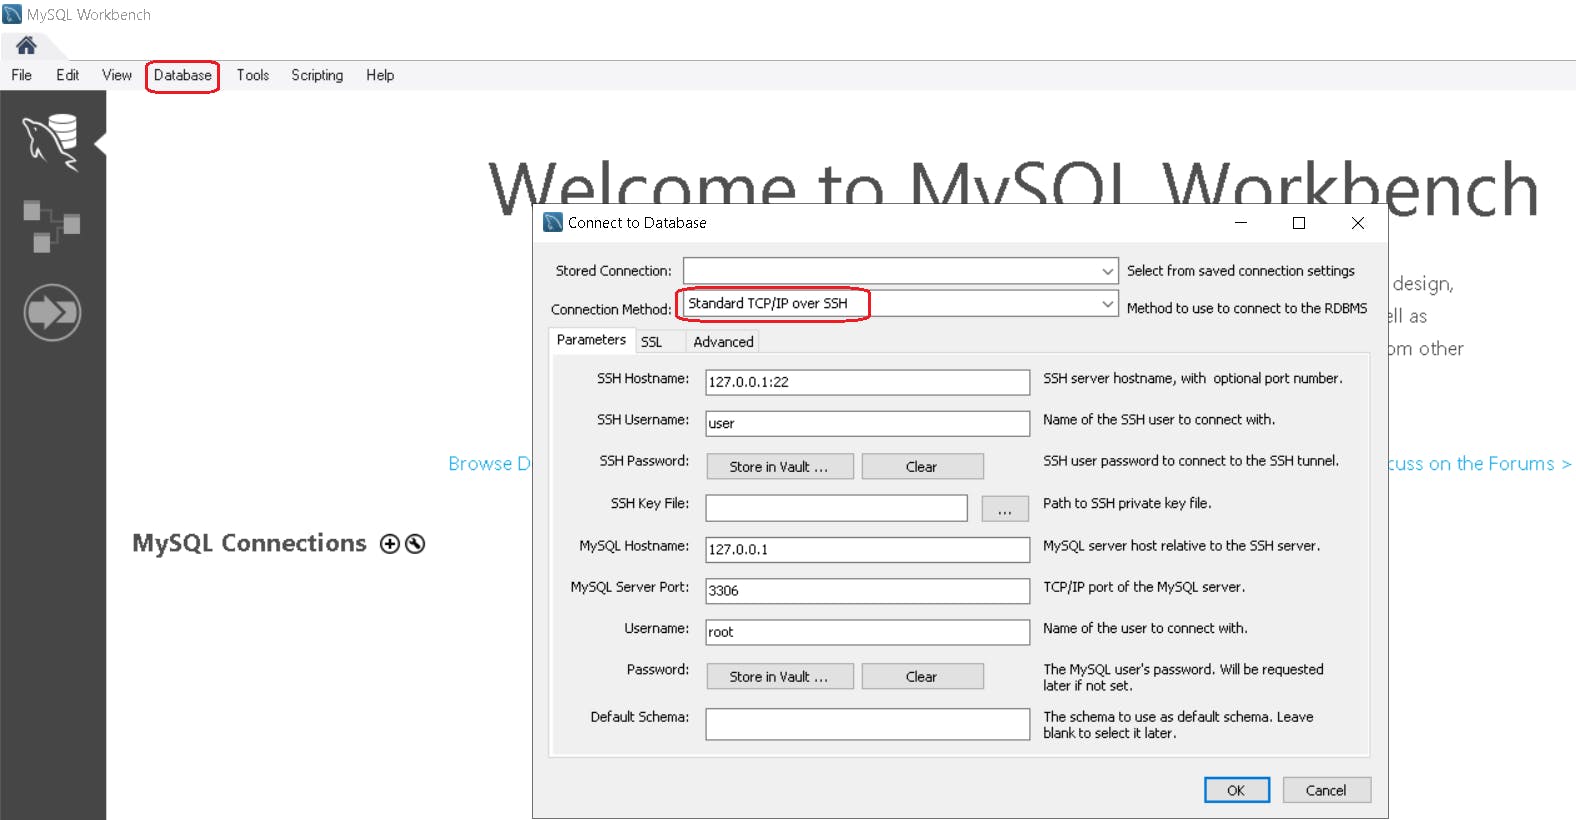
To populate the website database, we need a MySQL database tool for importing the file. I made use of MySQL Workbench.

Download and Install MySQL Workbench
Navigate to the Database menu and click
Connect to database- Connection method should beStandard TCP/IP over SSH.Fill in the required configuration details under
Parameters.SSH Hostname = Public DNS of our Dev Server
SSH Username = ec2-user
SSH Key File = Select the Private Key of our Dev Server
MySQL Hostname = RDS Endpoint
MySQL Server Port = 3306
Username = RDS Master Username
Password = click '
store in vault' and enter RDS Master Password then clickOK.
To import the SQL data, click on 'Data Import/Restore' - Select 'Import from self-contained file' - Browse to our FleetCart SQL file - Select the file - Under Default target schema select our 'Database name' - Click on 'Start Import'.
To import the dummy files into the webserver, run the script below and be sure to replace values with the link to your own S3 bucket for dummy files.
  #!/bin/bash
  sudo aws s3 sync s3://adekunle-dummy-bucket /home/ec2-user
  sudo unzip dummy.zip
  # Enable dotglob to move hidden files and folders
  shopt -s dotglob
  sudo mv dummy/* /var/www/html/public
  # Disable dotglob
  shopt -u dotglob
  sudo rm -rf /var/www/html/storage/framework/cache/data/cache
  sudo rm -rf dummy dummy.zip
  sudo chown apache:apache -R /var/www/html
  sudo service httpd restart
Create Webserver Image
Navigate to the AWS Management Console and access the EC2 service. Select the dev server and choose 'Actions'. From the dropdown menu, select 'Create Image' to generate an AMI based on the current state of the server.
Add a descriptive tag for 'Name' to easily identify the image. Ensure the option to tag both the image and its associated snapshots is selected. This maintains consistent tagging for future reference and management.
Complete the process, allowing AWS to create the AMI. Once done, the image will be available for use in launching new instances with the same configuration as the Development Environment Server.
Set up Application Load Balancer (ALB)
Launch an ec2-instance in each of the private app subnets. We have to make use of the AMI we created out of the Dev Environment server and assign the Webserver security group.
Create a Target Group of type instances and add both instances we created. The protocol should be HTTP on Port 80. Set up health checks with '200, 301, and 302' success codes over HTTP.
Navigate to Load Balancers and create an Application Load Balancer, map it to the two Public Subnets, and configure a Port 80 listener associated with the Target Group we created above. Once it is done provisioning, we can now reach our website using the Load Balancer DNS.
Configure A-Record
On the Route-53 dashboard, navigate to the hosted zones and click on our existing domain name. Click on Create record - enter "www" as the subdomain and leave A as the record type. Toggle on the Alias button to select Alias to Application and Classic Load balancer then select the ALB region. Select the ALB and click 'Create records'.
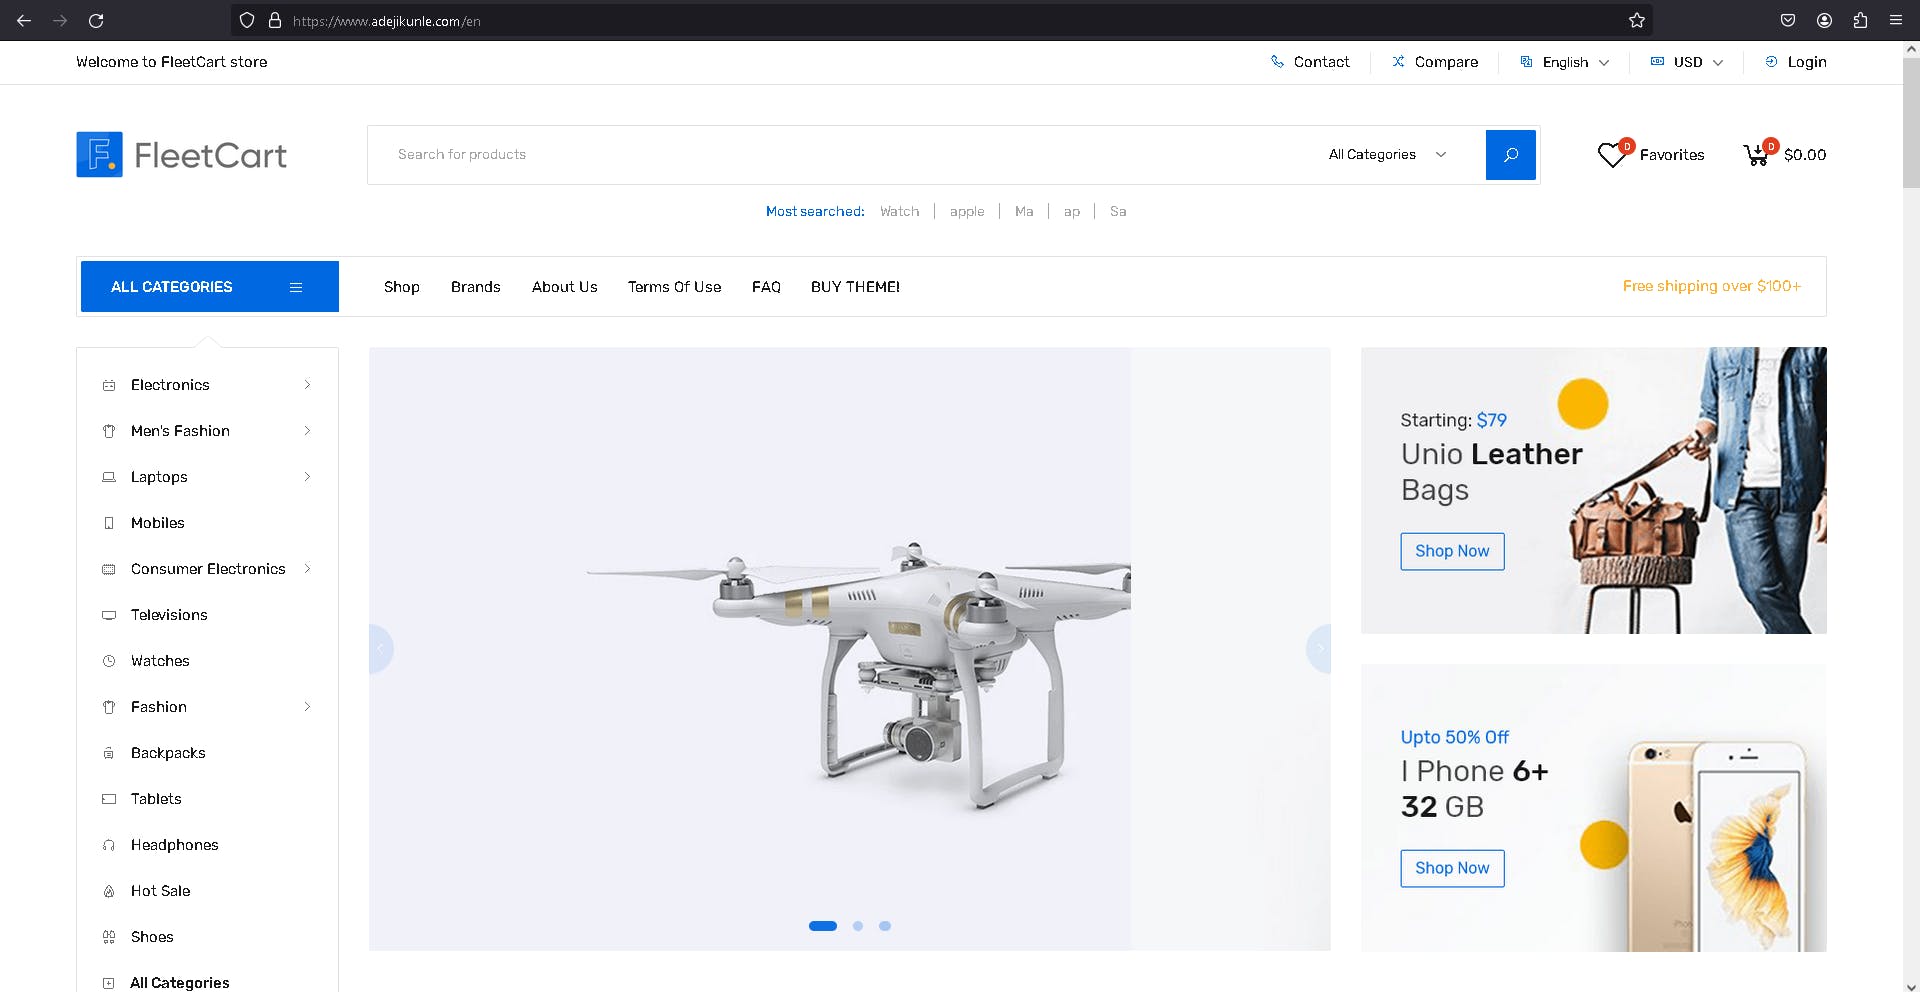
We should now be able to reach our website using our domain name.
Set up HTTPS Listener
Navigate to our Application Load Balancer and under Listeners, add a new listener for HTTPS forwarding traffic to port 443 and select our SSL Certificate under ACM.
Edit the existing HTTP listener, changing it from
forwardtoredirect. Redirect it to HTTPS on port 443.
Update domain name configuration in our webserver
This is necessary because the server already stored the value of the Webserver's Public IP as its URL and because of this, the site does not load properly when we access it using the domain name.
First, terminate one of the webservers.
SSH into the existing webserver through the Dev Environment server in the public subnet and Run the script below.
  #!/bin/bash
  # Replace 'www.adejikunle.com' with your domain name
  sudo sed -i 's|^APP_URL=.*|APP_URL=https://www.adejikunle.com|g' /var/www/html/.env
  # Restart apache server
  sudo systemctl restart httpd
The
sedcommand replaces the value of theAPP_URLin the.envfile with our preferred domain name. So be sure to update thesedcommand with your domain name.
Create an updated Webserver Image
Following the steps we took when creating the first Image, we will create another image from the webserver we just modified. Terminate the webserver instance once the image has been created, then deregister and delete the previous AMI and Snapshot.
Set up Auto-Scaling Group
We will create a launch template and use it to set up an auto-scaling group with a desired capacity of two running instances, a minimum of one and a maximum of four instances in the private app subnets.
Launch Template: Navigate to Launch Template and create one with the AMI we just created from the webserver. Remember to Check the 'provide guidance …' when setting up the template. Make use of the Webserver Security Group.
Auto-Scaling Group: Navigate to Auto-Scaling Group and set it up by using the created Launch Template. Select the Private app subnets as well as our already created ALB and Target group. Check Elastic Load Balancer under health check and specify the group size as 1- minimum, 2-desired and 4-maximum. Configure SNS topics for alerting and add a tag for the Auto-scaling group. Then review and create.
Our eCommerce website is now completely set up.

Blockers
The major issue I faced when executing this project was after my initial set-up of the Dev Environment server. My website was unreachable and after hours of troubleshooting, I was able to narrow it down to the PHP version I installed.
Because I initially made use of Amazon Linux 2023 AMI, my yum repository installed PHP version 8.2 by default which was incompatible with the Laravel version of my FleetCart template.
From Amazon Linux 2023 AMI documentation, I found out that support for amazon-linux-extras has been discontinued and I am unable to specifically set the PHP version I want to install to version 7.4.
To resolve this, I had to make use of the Amazon Linux 2 AMI which allowed me to run this command sudo amazon-linux-extras enable php7.4 to specifically install PHP 7.4.
Cleaning up our Deployments
We can delete our resources in the following order:
First, destroy the Dev Environment Server, Auto-Scaling Group, Launch Template, Deregister and delete AMI and Snapshot, Application Load Balancer, Target Group, RDS (I selected the option to create a final snapshot here because I'll need it in a future project), Database subnet group, Empty and delete S3 Buckets, delete A-Record.
After all these, we can then make use of terraform to destroy our VPC services.
Acknowledgements
Credits to AOSNOTE for the project guidance.
